MS04: Better Video on a Budget
Because who's going to find a Cam Link and camera during a global pandemic?
Hello and Housekeeping

Thanks again for all the new signups for the newsletter! I’m really satisfied with what I’ve produced so far, and helping people has given me something to focus on lately. Otherwise, I’ve been doing some writing on my site, including some recent work about restarting FFXIV.
If you’re curious about how to support me further, I’m working to improve the perks offered by my Patreon; even pledging a dollar per post like this one really helps.
Amazon links in this newsletter may be affiliate links; this helps me support myself.
Lockdown lighting and video
When I was in high school, I was going through the typical teen troubles of finding a group of friends. Eventually, I found an internet forum for ravers, and despite not being able to drive, go to raves, or afford anything related to it, I thought dancing with glowsticks was cool. I was also 14.
Making my own videos (and probably weirding out my parents) was an interesting process because I got to learn the basics about how cameras work. In order to capture the glowsticks well enough, and at a decent FPS, I learned how to tweak, tweak and tweak some more (settings, not drugs).
I bought my first webcam for $150; the Logitech QuickCam Pro 4000 had a monumental 640x480 resolution, and well, I had to figure out how to make me look cool. Through learning about light and how cameras process it, I got to learn about what settings affect what degrees of quality.
COVID-19’s lockdowns has put a lot of focus on people upgrading their home video setups across all industries, and acquiring whatever they can in order to look better in meetings or on broadcasts. This has meant shortages for things that creators previously had a lot of access to, like El Gato’s Cam Link capture card, key lights, and other gear.
This has meant that people have had a harder time upgrading their setups; with this week’s newsletter, I felt the need to teach people that:
You don’t need to drop a ton of money on a DSLR, capture card, and key lighting to get good (or well, decent enough) video.
Getting better video mostly hinges on lighting, lighting placement, and turning off the right automatic settings on your webcam.
Dumping money into gear doesn’t always lead to a better product. Weekend projects and learning how things work build fundamentals that serve you long-term.
Part 1: Settings
In OBS, or in most video applications, you typically have a “settings” menu with a bunch of sliders, checkboxes, and labels. However, it isn’t exactly clear what these settings do, and how they’ll affect your video. Depending on your OS or webapp, these might look different, or you may not have access to them at all.
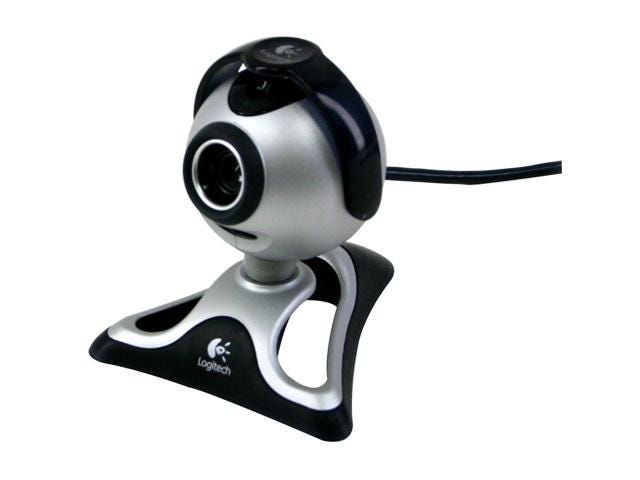
With most Logitech webcams that I’ve owned, and in OBS, it looks something like this:

These are the default settings for my Logitech c930 webcam. The settings we’re going to be focusing on most are the Exposure, Gain and Focus. While these all have very technical definitions with relation to how cameras work, I’ll give you my shorthand:
Exposure gives you an idea of how much light is hitting your camera’s sensor. High exposure means that it’s taking in a lot of light, and low exposure means that it’s taking in lesser amounts of light. In camera terms, exposure is “a combination of the f-stop, which is the size of the hole in the lens, and the shutter speed, which is the length of time that the shutter is open.” [1]
Gain is “a digital camera setting that controls the amplification of the signal from the camera sensor. It should be noted that this amplifies the whole signal, including any associated background noise.” [2] When you combine this with your exposure, you get a mix of “how much light are you taking in, and how much is your camera amplifying it?”
Focus keeps things sharp and clear. Being able to have manual focus means your camera doesn’t have to constantly adjust to your movement; set it once, and forget about it.
Think of gain, exposure and light like audio on a microphone: the farther away a microphone is from your mouth, the more sensitive it needs to be to pick up your voice. However, this means picking up things like echo, or things you don’t want it to hear. If the microphone is close to your mouth, you can turn the sensitivity down — it can then focus on picking up just your voice.
If you don’t have a lot of light, you need to make your camera work harder to compensate for that, usually at the expense of your FPS, color, and quality. If you have adequate light, the camera doesn’t have to spend as much resources compensating, which means smoother, sharper video.
Your goal is to make sure that the light your camera taking in is ideal as possible before it enters your camera.
Part 2: A sidebar about lighting positions and examples
During journalism school, I learned three things that I think about every time I set up video for streaming or web calls:
#1: Frame yourself from the armpits up.
Video framing should emphasize your face and shoulders. Obviously, this is affected by where you can place your camera, but I’ve found that it looks the best as straight-on as possible, with your armpits just above the bottom of the frame.

In contrast, having too much headroom means that the audience is focusing less on you.

#2: Place your lighting behind the camera, so you face the source of light.

As you can see, I have my Nanoleaf Aurora panels behind my monitor (where I’m looking), and my camera (that’s pointing at me. The panels’ brightness can be controlled, which means I’m not being blinded.
#3: If needed, bounce the light

Lamps with flexible or rotating heads can be pointed at the ceiling in order to “bounce” the light. If your ceiling is painted white, this helps to spread the light out from your source, across your face. This may require more than one lamp, but this is where the “on a budget” comes in.
In journalism school, we used to steal conference placards because they were plastic, and white on the reverse side. We used these to bounce light if needed. This is a bit of a desperate solution, but hey, experiment.

My point is, you don’t need to rush to buy a softbox or professional key light in order to experiment with what light can do for your video. Systems like the Ikea TRÅDFRI system also allow for cheaper dim-able solutions that work with most lamps.
Part 3: Examples with a webcam
I thought I’d open up OBS with examples of video, along with their settings, to explain how light and camera settings affects video.
If needed, check out the web version of this newsletter if the GIFs don’t load.
For context: a higher exposure number means less light being taken in by the camera itself. A higher gain number means the camera is struggling less to compensate for the light it gets.
Example #1: Full Auto Exposure, Full Auto Gain, Lights Off
Fully automatic, with no lights on, you can see how hard the camera has to work. My hand is a blurry mess due to the light that the camera needs to take in to compensate. The colors are also swampy due to the amount of gain that needs to be applied due to the lack of light in the room.
By the settings above, even though they’re automatic, this is with “4” exposure, and “255” (maximum) gain.
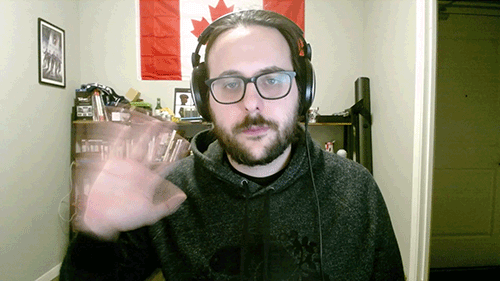
Example #1: Full Auto Exposure, Full Auto Gain, Lights On

In just turning on my white lights, you can see how the image changes. My hand is less blurry (although still blurs the faster it goes) and the color feels more natural because the camera is adding less gain to the image.
However, my face is blown out by too much light and the high amount of exposure. Even though they’re automatic, the settings are a “5” for exposure” (so the camera is taking in less light than example #1) and the gain is in the 50s.
Example #3: Manual Exposure, 0 Gain, Lights Off
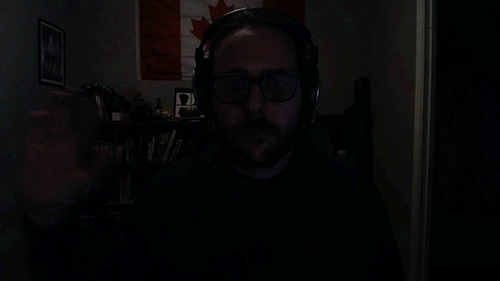
Unfortunately, I had to add a layer of exposure (ironic) to this GIF in order to get it to autoplay, because apparently that’s a thing.
From the settings above, this example had “6” exposure, and “0” gain. The camera is taking in even less light than example #1 and #2, and has no external light (besides the room’s ceiling light) to compensate for it.
Even without lights, and without extra exposure or gain, you can still see how my hand’s animation is no longer blurry while waving. However, without any kind of compensation, the viewer can barely see me. You can see the real version of this GIF here.
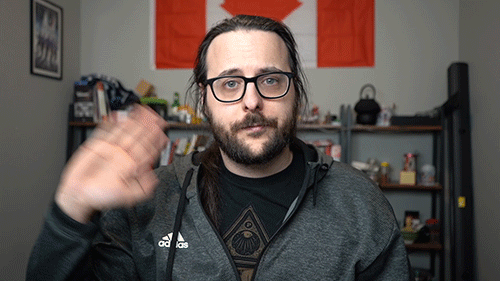
Example #4: Manual Exposure, 50% Gain, Lights On

This is what happens when you put it all together.
This is a “6” manual exposure, like the dark image above, “128” (so, 50%) gain, and with my lights on. It has good colors, good frames per second (this is probably the best you can hope for with a webcam), and the viewer can see me.
Bonus Example: Sony A7iii, Same Lights, Auto Focus and Exposure (and a different hoodie)
This is what my camera setup looks like, and what gets me some compliments from the calls I take part in.
I have a Sony A7iii Mirrorless camera feeding its HDMI video into an El Gato Cam Link. The camera itself is handling the automatic exposure, and auto focus; however, this camera is a lot more powerful than your typical webcam.
Despite the difference in price and specs, you can see that the fundamentals are essentially the same:
Frame yourself well
Light yourself well
Don’t bog your quality down in automatic settings
Doing this allows you to get “good video”, even on a $100-200 webcam. Yes, it won’t be as sexy as a full, expensive setup, but buying expensive equipment solely to compensate for a lack of fundamental knowledge is a trap.
Part 4: The equipment investment trap
Purchasing an expensive setup as an indie creator (or one that hasn’t reached the level of "needing it”) too soon means you’re putting pressure on yourself to justify the purchase. From personal experience, this creates an extreme amount of unhealthy stress that not all people thrive in.
It also creates a “retail therapy” response: your brain is satisfied because it can think it accomplished something by making the purchase, when in reality, it hasn’t done anything yet. It’s the equivalent of spending thousands on expensive workout equipment, when mostly what a person needs to build good habits is something simple, like body-weight exercises or regular walks around the block.
It also becomes a crutch that keeps you from learning fundamentals that allow you to express your creativity. Something filmed by a great camera without fundamentals may look great (either by luck, or by being carried by the technology), but won’t convey the same message, passion, or skill as a someone who knows how to pull potential from a lower-budget setup.
Wrapping Up
This one ended up being much longer than I anticipated. I didn’t know that there was a max length for emails!
We’ll be back next week. Thanks for your time, and follow me on Twitter, Instagram and Twitch if you’re interested in hearing more from me.
— M